In short : this practical eight-part guide reviews everything a beginner needs to know to master their first wave in bodyboarding: choosing the equipment, physical preparation, getting past the break, first and second techniques, reading the waves, safety, spot selection, and quiver maintenance. Shop anecdotes, concrete examples, comparison tables, and key links to go further: everything is gathered to turn each session into a true moment of gliding.
Equipment: selecting the ideal board, fins, and leash to progress quickly
The core of a practical guide dedicated to bodyboarding can only start with equipment. Even before thinking about rushing into the foam, board selection determines the entire learning curve. An 80 kg frame trying to float on a polyethylene core meant for children will have the same fate as a skimboard stranded on a shore-break: it sinks. To avoid this scenario, it is recommended to check three points: size, density, and shape.
The simplest rule is to choose a board measuring between the navel and navel + 5 cm when the rider places it vertically. Manufacturers now display a precise weight/size/stiffness chart. Beginners find a reliable summary in the complete guide to choosing your ideal bodyboard size. The core choice is resolved according to water temperature: PP when the sea flirts with 18 °C, PE for cooler latitudes or for riders who prefer flexibility.
The choice of fins follows the same logic: foot volume, blade stiffness, boot comfort, and paddling power. Symmetrical models facilitate orientation because the pull is distributed evenly. For starting sessions, investing in a spiral biceps leash remains essential. In case of a violent wipe-out, it brings back the board without turning it into a projectile.
To help the new enthusiast, a seller at the Landes shop “Foam & Speed” often tells Ana’s story, 2026: she chooses a PE 42” board for 65 kg, adds a phone leash and medium flex fins. Three weeks later, she was already chaining take-offs in beach-break. Beyond fiction, the example shows the relevance of a coherent set-up.
Before starting practice, let’s remember two often forgotten accessories: wax (only nose and rails to avoid clogging the hull) and neoprene boots that protect against irritation caused by fins.
- 📏 Board at navel height
- 🐬 PP core for warm water
- 🌊 Spiral biceps leash
- 🦶 Symmetrical fins + fin leash
- 🕸️ Wax targeted on pressure points
Finally, parents can consult the “kids” comparison on the specialized site via this link: find the best board for a 6-year-old child.
| Material | Water temperature 🌡️ | Stiffness 🪨 | Target audience 🎯 |
|---|---|---|---|
| Polyethylene (PE) | < 17 °C | Flexible | Beginner & heavy rider |
| Polypropylene (PP) | > 17 °C | Rigid | Intermediate |
| Carbon/PP | All | Ultra-rigid ⚡ | Competitor |
Physical conditioning and swimming: preparing the body before the first break
Endurance is the fuel powering every paddle, every duck dive, and every last-second sprint to catch a hollow wave. Coaches insist: a cycle of three weekly swimming sessions turns a simple Sunday outing into a productive session. 800 m freestyle, 400 m kickboard kicks, 200 m freestyle with arms only: this circuit simultaneously strengthens cardio and paddling technique.
Core strengthening is the other pillar; a solid body withstands the twists triggered by a poorly executed bottom turn. Plank, side plank, and superman exercises engage abdominals, lower back, and glutes. Professional body surfers complement with explosive work (burpees, squat jumps): maximum power is called on at kick-off when the lip approaches.
An anecdote from the “Rip & Roll” club illustrates the importance of conditioning. Hugo, 17, left high school to join the ocean without warming up. On the third day, hamstring strain while paddling. Two weeks out of the water. Moral: ten minutes of joint mobilization avoids many troubles.
Post-session stretching also maintains hip and shoulder mobility. A foam roller and a strap suffice to avoid myofascial knots that eventually limit paddling speed.
Breathing plays a subtle role: diaphragmatic control helps maintain calm underwater after a wipe-out. Diving into a pool and attempting to swim 25 m underwater is a good serenity test.
Before moving to the next section, keep in mind that a realistic program is better than a heroic plan abandoned within the week. Three watchwords: progression, regularity, recovery.
Getting past the break: paddling techniques, duck dive, and positioning at the peak
A beginner quickly understands that the true judge stands between him and the take-off zone: the white-water. To cross it without exhausting all energy capital, the strategy is based on three axes: trajectory, timing, execution.
Trajectory first. Aiming for the calmest shoulder of the wave rather than charging straight into the foam avoids power. Swimming out diagonally saves up to 40% of paddling according to the study “Hydrodynamics & Boards” published in 2026 by the Coastal Research Lab.
Timing next. Observing the set from the beach, counting sets, and spotting the “lulls”, these resting intervals, ensures a departure at the right moment. An old local saying goes: “Those who read the ocean, shorten their paddling distance.”
Finally execution: an effective duck dive is done in three stages: firm pressure of the palms on the nose, weight transfer forward to push the board down, leg extension to straighten the board behind the wave. If poorly coordinated, the board jerks and the rider is thrown backward. To automate the movement, many coaches require ten repetitions in 80 cm of water before each session.
Positioning at the peak requires constant attention. Lateral currents sometimes move riders by 15 m in less than two minutes. The rule is to choose a fixed landmark (lifeguard hut, rock, umbrella) and align it regularly to stay within take-off range.
A board with a denser core facilitates the duck dive: rigidity cuts through the wave rather than following it. On this point, the “PP vs PE” comparison detailed here choosing the best bodyboard type provides concrete flexibility measurements.
Small equipment digression: some riders add a set of paddle gloves to gain paddling power. The gain is real, but learning the natural movement without artifices remains the priority.
First maneuvers: take-off, bottom turn, and quick trim
The decisive moment arrives: the wave barrels, the board accelerates, and the gliding instinct awakens. The take-off in bodyboarding activates as soon as the push is felt, the fins kick powerfully three times then lift to reduce drag. The stomach remains supported, forearms grip the nose, and a slight weight shift towards the inside rail launches the initial curve.
The key to a successful bottom turn lies in compression: inside elbow pressed to the deck, hip applying pressure, gaze towards the lip. This compression-extension forms a majestic “S” visible on any pro clip. Practicing in 80 cm glassy water in the morning offers an ideal environment.
An effective teaching method is to film the session with a smartphone from the shore. Reviewing, the rider often notices a torso too high or a relaunch timing too late. Visual feedback shortens learning time.
To maintain speed, a trim trajectory (horizontal displacement) is vital. Gliding just below the lip, on the smoothest part, avoids energy loss.
Most schools advise repeating 15 “straight line” waves before allowing a cut: this forges a sense of speed. On the Basque coast, instructor Pascal nicknames this method “the bus lane”: straight ahead until the engine warms up.
Advanced maneuvers: 360°, rollo, and reentry for a signature style
When the foundation is solid, the desire to throw a 360° arises naturally. The recipe? Speed, weight centering, shoulder rotation, and eye engagement. The board must rotate around an imaginary axis passing through the navel. On soft beach-breaks, a lip bounce helps trigger the rotation.
The el rollo, an iconic maneuver invented by Pat Caldwell, combines reentry and aerial loop. The secret lies in reading the section: starting early to take advantage of foam projection and getting the board completely out of the water. Too late, the rider gets swallowed by the valve.
The cut back, meanwhile, delivers a speed boost when the wave softens. It resembles an “S” turn: weighting the outer rail, controlled pivot, returning to the foam, then re-acceleration along the wall.
Here are five chrono-technical landmarks 💡 :
- 🚀 Acceleration as soon as the slope is at 30°
- 🔄 Shoulder rotation synchronized with leg lift
- 🌀 Pivot point at the center of mass
- 🤸 Gaze always a quarter turn ahead
- 💥 Absorb impact by flexing torso and knees
For inspiration, the article unforgettable destinations for bodyboarding compiles spots where the lip is particularly suitable for rolls.
Safety, courtesy, and priorities: sharing the wave smoothly
In bodyboarding as in surfing, the code of conduct in the water is not optional. Priority goes to the rider closest to the inside of the wave. Non-compliance leads to collisions and tensions in the water. Clubs often display this reminder on their signs: “Look at the shoulder before paddling!”
Knowledge of currents constitutes a second safety barrier. A swimmer caught in a rip current can drift at 5 km/h offshore. The bodyboarder has a board; they stay calm, let themselves drift, then exit diagonally.
Some tips:
- 🛟 Keep your leash in good condition, inspect the Velcro weekly
- ⚠️ Monitor the tide using the analysis on best tide for bodyboarding
- 🔊 Communicate: a “Left!” or “Right!” avoids accidents
- ⛱️ Spot swimming zones and respect the flags
- 🩹 Keep in the car a first aid kit with saline solution and waterproof plasters
In case of serious injury, the standard procedure recommends keeping the wetsuit on to maintain body heat and calling emergency services via the coastal number displayed on the beach (often 112 in Europe).
Surf insurance generally covers equipment damage; however, checking the “competition” clause avoids surprises. To extend equipment longevity, read the article bodyboard lifespan: expert advice.
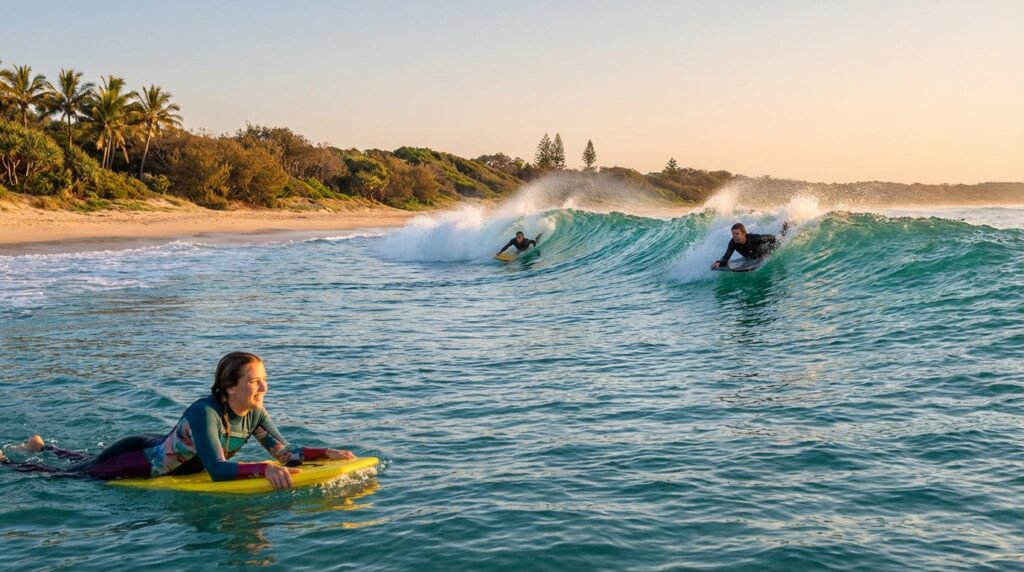
Spot choice and wave reading: beach, reef, or point?
Determining the right playground increases success chances by 70% according to the French federation survey published in 2026. Beach-breaks offer variable sandbanks, perfect for learning safely. Reef-breaks require precision and knowledge of the seabed. As for point-breaks, they provide long waves, ideal for chaining several maneuvers in the same section.
For a first trip, the following checklist serves as a compass:
- 📊 Dominant swell orientation
- 🧭 Wind direction (offshore preferred)
- 🌡️ Water temperature to choose the wetsuit
- 🌙 Tide coefficient
- 🤿 Depth and seabed nature
The site ideal wave height helps refine observation: a beginner will look for clean 0.5 to 1 m waves, while an experienced rider will await hollow 1.5 m waves.
An anecdote illustrates the difference: during a trip to Itacoatiara, three novices ventured onto the main slab, result: broken boards and bruised egos. Yet, fifty meters away, an insignificant beach-break rolled out a perfect school wave.
Maintenance, repair, and storage: prolonging the life of your quiver
Rinsing the board, leash, and fins with fresh water after each session extends their lifespan by 30%. Saltwater crystallizes, weakens the slick, and oxidizes the leash plug. A simple bucket suffices when no shower is available.
For drying, prefer a shaded area. UV radiation damages foam and fades colors within weeks under tropical climate. A ventilated carrying bag is a modest investment compared to the cost of a new board.
In case of cracks, a UV resin kit repairs small damages in 15 minutes. Be careful not to confuse HDPE slick and core: if the impact reaches the core, a professional must laminate a complete patch. Specialized shops offer step-by-step video tutorials, with workshop service shipped by parcel.
Long-term storage requires a room between 15 and 25 °C, flat or vertical on a rack. Excessive heat deforms rocker; extreme cold stiffens the core and promotes breakage.
A rider following these tips can keep their main board for three intense seasons or more, as illustrated in the historic article the history of bodyboarding.
What bodyboard size should I choose for 80 kg?
An 80 kg rider will find comfort and speed on a board measuring 42.5 to 43 inches, with a polypropylene core to maintain stiffness. The detailed guide here breaks down the options by level and water temperature.
Can you practice bodyboarding without fins?
Yes, but catching waves becomes three times more difficult. Fins provide propulsion, stability, and safety. For progressive training, alternate ten waves with fins and two without.
How to avoid calf cramps during sessions?
Hydrate, stretch calves before putting on fins, and check that the blade does not compress the ankle. Some riders add fin straps to reduce tension.
Summer wax or winter wax: what’s the difference?
Summer wax melts starting from 25 °C, winter wax at 15 °C. Using the wrong formula leads either to wax that doesn’t stick or to slippery soap.