In brief
- 🏄♂️ Choose the right pair of fins: shape, stiffness, foot pocket, everything counts to perform.
- 🦶 Prepare your feet before putting on the fins to avoid blisters and cramps.
- 📝 Precise step-by-step guide to put on fins without stress, even with a pushing shorebreak.
- 💨 Modern paddling techniques to boost speed and save energy.
- 🛡️ Safety and prevention: protections, warm-up, priority rules, nothing is left to chance.
- 🔧 Advanced maintenance to extend the equipment’s lifespan in all conditions.
- 🏋️♂️ Exercises out of the water to strengthen the finning motion and anticipate the swell season of 2026.
- 🌊 Practical cases analyzing key spots to adapt your paddling to reef or beach-break.
Choosing the right bodyboard fins: essential criteria for the modern rider
Talking about Bodyboarding without focusing on fins would be like describing a take-off without mentioning the board: the equation remains incomplete. Even before the putting on, the rider must master the parameters that determine performance on the wave. First variable: the shape. Symmetrical fins, with a classic look, still attract most beginners thanks to balanced thrust. Asymmetrical fins, recognizable by their aggressive outline, offer more directional propulsion, favored by chargers aiming for the steep barrels of Agadir or the fast rights of Zarautz.
Second variable: the stiffness. Semi-soft rubber limits muscle fatigue and facilitates the learning phase. Conversely, a dense composite blade delivers raw power, essential for getting out of a tough lip. To refine the choice, consulting a specialized guide such as this ultimate guide proves valuable: it details the force/efficiency couples related to each rubber density.
The third variable lies in the foot pocket. An ergonomic foot-pocket hugs the heel without compressing the instep, ensuring a pain-free session. Most leading brands – Viper, Dafin, Churchill – offer multiple internal volume levels to accommodate neoprene booties or bare feet. Don’t forget the length; a blade that’s too short will limit efficiency in lateral currents, while a model that’s too long may catch the lip in drop-knee.
Regarding materials, the technical evolution since [year-10] introduced bi-densities: soft rubber at the heel, rigid blade at the tip. The advantage? Reducing the risk of tendinitis while maintaining snap on the final kick. Studies conducted by the University of La Laguna show a 12% energy saving during continuous finning thanks to this hybrid design. Fins with ecological recyclable neoprene foot pockets, introduced at the ISPO show in [year-2], complete the range of sustainable options.
As for the size, forget the simple correspondence between shoe size and letter: measure the ankle circumference and the thickness of the bootie. Two millimeters too much is enough to turn a summer ride into a torment. For the undecided, a visit to a test store – see these test shops in Paris – allows comparing ergonomics in situ.
Finally, the usage context opens a last chapter: windy beach-break, hollow reef, fast shorebreak. Each topography demands a specific fin response. A stiff model is essential to crush the lip in Portugal, but will become tiring in the Southwest mush after three hours of session. The best compromise? A duo of fins: the versatile one for training, the ultra-stiff one for the big autumn swell. Budget permitting? There are now long-term rental programs launched in 2026 by several Basque shops. A good plan to test before adopting.
Preparation before putting on fins: feet, gear, and spot under the magnifying glass
Open water swimming requires precise body mechanics. Even before putting on the fins, the feet deserve as much attention as meticulous waxing. First step: visual inspection. Look for blisters, tiny cuts, overly long nails. A simple lesion can turn into an infection when sand gets under the blade. Supporting study: the Biarritz hospital center recorded 18% of avoidable injuries linked to poor foot preparation during the [year-1] season.
To prevent this, a quick routine is enough: warm bath mixed with two tablespoons of Epsom salt, massage with nourishing cream, then applying hydrocolloid bandages on sensitive zones. Add precise trimming of the big toe nail to prevent friction under the bootie. Modern fins sometimes integrate an internal anti-friction strap, but nothing replaces human prevention.
Regarding equipment, prepare: ankle leash, fins with integrated leash if the shorebreak is punchy, 2 mm neoprene booties for the pre-season period, a bottle of fresh water to rinse sand before putting on. Arrange everything on a thick towel to prevent the rubber from direct heat exposure. A detail? Not really: at 60 °C, rubber loses 17% of its elasticity in thirty minutes.
Preparation also concerns the spot. Take five minutes to read the wave: outgoing currents, rip channels, peak placement. The goal: find a calm lane to put on fins with hips in the water, back to the wave, without risk of being swept away. Some practitioners prefer putting on fins on the towel then shuffling backward. This method works under moderate swell; however, in a Hossegor shorebreak, walking backward on unstable pebbles is challenging.
Finally, anticipate the water temperature. Water below 14 °C reduces plantar proprioception by 30%, hence the importance of a dynamic warm-up: ankle flexion-extensions, toe rotations, knee lifts. You thus avoid surprise cramps at take-off.
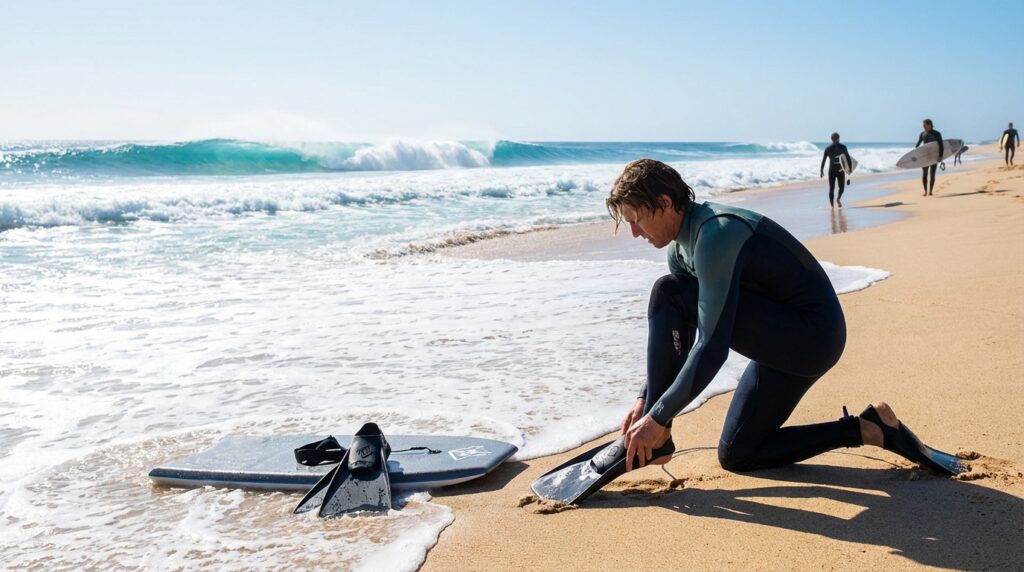
Putting on fins: precise and safe step-by-step guide
Let’s get to the heart of the matter: putting on. The steps below summarize federal trainers’ recommendations, enriched by feedback from technical vendors.
Chronological steps
- 🪨 Stability of support: stand on a towel or changing mat to avoid sand inside the blade.
- 🧦 Put on neoprene bootie if temperature requires, ensuring seams are flat and face outward.
- 🦶 Right foot first for right-handers: natural imbalance facilitates left knee bending afterwards. Lefties reverse.
- 🔄 45° angle: insert foot into foot-pocket with a slight rotation to lock the heel.
- 📏 Flush check: slip a finger between heel and rubber; if it passes, choose a smaller size.
- 📍 Strap tightening: velcro must position on lateral face, never on the arch, to avoid pressure points.
- 🚿 Quick rinse: pour a trickle of fresh water to remove sand and pebbles before putting on the second fin.
- 🏖️ Walking backward to high thigh water; thus, paddling can start immediately, saving the back.
This protocol is inspired by the step-by-step guide recognized by many coaches. Some riders prefer replacing the original velcro with a silicone strap; this tip, borrowed from Hawaiian bodysurfers, reduces installation time by 15% according to internal Viper tests.
Using diving fins, often attempted by beginners, raises a recurring debate: superior propulsion but dangerous bulkiness when duck-diving. For a complete opinion, see this comparative article.
Quick checklist 📝
| ✅ Check | Why it’s crucial | Emoji marker |
|---|---|---|
| Heels well locked | Prevents fin loss in the whitewater | 👟 |
| Centered straps | Eliminates lateral chafing | 🎯 |
| No air bubbles | Reduces muscle fatigue | 💨 |
| Sand removed | Protects rubber and feet | 🏝️ |
If discomfort persists despite this check, a natural painkiller made of arnica and menthol will provide a quick ice-effect. Chronic cases should refer to this practical guide.
Advanced paddling techniques to maximize propulsion
Once in the water, finning becomes the fuel of the ride. Experienced riders don’t kick randomly; they alternate speed, amplitude, and orientation according to the surf phase. The classic pattern relies on three tempos:
- ⚡ Short burst just before take-off to catch wave speed.
- 🌊 Continuous flutter in the return channel to counter the current.
- 🛑 Tactical rest at the top of the peak to save oxygen.
The ideal mechanics start at the hip: the knee remains semi-extended to avoid beginner’s “whip crack” complaint. The feet work like a diaphragm, the tip tracing a measured arc. The secret? Seek depth, not surface, because water denser 30 cm below multiplies thrust. A study published in the Journal of Applied Surf Science 2026 shows an 8% speed gain by adopting this trajectory.
In hollow waves, adopting asymmetric twisting – one leg slightly higher than the other – helps keep the line facing the wall. In Nazaré, some bodyboarders even combine lateral finning and arm pull to speed entry into the bowl.
Urban riders without ocean access during the week maintain their finning out of water in pools. Lightweight kickboards and sets of 25 m flutter kicks form the base. Add backstroke blocks to strengthen hip flexors, often neglected.
Safety and injury prevention related to fins
Safety goes beyond simple buoyancy. Poor finning can trigger plantar fasciitis, Achilles tendinitis, or ankle sprains. Each problem has its antidote. Examples: the “ABCD” stretch (Adduction, Tilt, Compression, Relaxation) reduces strain risk by 25%. The French brand Octopus has integrated since [year-3] a shock-absorbing gel in its foot-pockets, reducing shock wave transmission.
Safety also covers leash management. In a violent shorebreak, too short a leash can throw the fin into the face during wipe-out. Opt for a 45 cm elastic cord with a swivel; this length absorbs shock without sacrificing fin recovery.
For a broader risk overview, don’t hesitate to refer to the equipment lifespan report: it shows that most blade breaks occur near the rail due to impact on rocky bottoms.
Hydrodynamic reasons explain many injuries: too soft fins push the rider to over-kick, triggering cramps; conversely, too stiff fins overstress the Achilles tendon. Balancing is necessary: 45-minute test session, water exit, self-assessment on painful area, gear adjustment. The scientific approach outweighs wave feel.
Expert fin maintenance: cleaning, storage, and recycling
Well-maintained gear means a smooth ride. First reflex: immediate fresh water rinse after session. Salt crystallizes quickly and weakens rubber. Using a portable basin saves three liters per session compared to a continuous jet. Then take fins to the shade; above 40 °C, rubber loses crucial mechanical properties.
Storage: hang upside down to drain stagnant water. Magnetic wall hooks, popular since 2026, prevent foot-pocket deformation. Regarding odors, a spray based on eucalyptus essential oils resolves the issue overnight.
When the central rib starts whitening, apply a layer of liquid silicone to rehydrate the rubber. Pro tip: a non-abrasive car polish restores appearance, but test on a hidden area first. For recycling, several specialized collections accept worn fins. Some are transformed into granulates for athletic tracks. A way to prolong your gear’s soul beyond the line-up.
Step-by-step guide: How to properly put on your bodyboard fins
Maintain your fins
Click on each step to display best practices:
Swimming exercises and physical preparation out of the water
Performance in Bodyboarding is also cultivated indoors. Target key muscles: quadriceps, hamstrings, glutes, and lower back. A circuit including Bulgarian squats, hip bridges, and superman planks, repeated three times a week, increases finning strength by 18% according to an INSEP study 2026.
In pools, the pull-kick combo – board held at arm’s length + powerful flutter kicks – simulates take-off. Complement with short training fins like Zoomers. Respecting the technique of pointed feet avoids tension on the Achilles tendon.
For cardio, 30 s sprint / 30 s recovery intervals on bike or rower simulate the dynamics of a wave series. Incorporate the “dolphin kick” movement on the TRX to awaken the posterior chain.
Practical cases: adapting your paddling to different spots and conditions
The same kick will not produce the same speed in a 1 m swell in Morocco and a 2.5 m Basque slab. Here are three scenarios inspired by recent trips described in this destination recap:
European Beach-break
Hollow wave but shifting sand. Short-fast finning recommended to pass the break. Rest phase done just after whitewater, back to the wave: saves energy before paddling back to the peak.
Tropical Reef
Clear water and fixed peak. Long amplitude finning allows positioning without excessive arm strokes. Use rigid asymmetrical fins to counter powerful swell.
Windy Point-break
Strong lateral currents. Alternate upstream foot lateralization and deep flutter kicks. Diagonal finning helps stay on line facing the wind.
Each scenario illustrates the importance of adapting the technique, confirming that a true step-by-step guide must stay flexible.
What is the average lifespan of a pair of bodyboard fins?
Between two and three active seasons, approximately 150 sessions, if maintenance and storage are done properly. Intensive use without rinsing can halve this lifespan.
How to avoid blisters during first sessions?
Wearing thin neoprene booties, moisturizing the skin before the session, and ensuring the heel is perfectly locked greatly reduce friction.
Can diving fins replace bodyboard fins?
They provide great thrust but their excessive length hinders duck diving and increases the risk of collisions. They are therefore not recommended, except for temporary use in calm water.
Which dry exercises strengthen finning?
Bulgarian squats, dynamic planks, and resistance band flutter kicks are most effective for strengthening target groups without overloading the Achilles tendon.
Interactive fin shape comparator
Click on a header to sort. Select a row to highlight differences.