In brief:
- 🛠️ Selection of materials: understanding PE, PP, epoxy resin, and carbon stringer.
- 📏 Precise shape: template, rocker, rails, and channels designed for speed.
- 🔥 Step-by-step DIY manufacturing techniques, from sanding to HDPE slick.
- ⚖️ Comparative tables to optimize weight, flex, and buoyancy.
- 🔗 Links to expert guides for fine-tuning the choice of board.
- 🧰 Interactive toolbox to plan the ideal rocker line.
- 🎥 Educational videos and inspiring images between each section.
Choosing the right materials for a high-performance DIY bodyboard
Before even drawing the first curve of the shape, the DIY rider must compose their “foam salad”: polyethylene (PE) for flexibility, polypropylene (PP) for rigidity, epoxy resin for the outer skin, and HDPE for the slick. This combination determines the balance between flex, rebound, and durability, just like a chef selects their best ingredients.
PE, denser, remains the star of cold waters: below 18 °C, its shape memory offers a consistent elastic return. PP loves tropical heat: above 22 °C, it keeps its nerve without softening. Experienced shapers sometimes place a thin layer of PE over a PP core to combine comfort and responsiveness. A hybrid approach inspired by high-end Flood or Sniper boards, brands mentioned in the guide to choosing the best type of bodyboard.
Epoxy resin then seals the deck. When coupled with a 6 oz fiberglass cloth, it locks the lamination while remaining lighter than classic polyester. However, watch out for exotherms: mixing above 30 °C creates bubbles, harms the slick, and can delaminate the board within two seasons, as highlighted by a recent lab test published in 2026.
To support this structure, the stringer acts like a skeleton. 8 mm spiral carbon, 10 mm fiberglass, or dual mixed rod: each option influences torsional speed. Templates over 85 kg should aim for a diameter over 9 mm to avoid the “banana” effect in powerful barrels.
Finally, the HDPE (High Density Polyethylene) slick ensures direct contact with the wave. Adding V-cut channels at 18° improves grip, a detail regularly mentioned in the bodyboard lifespan expert advice. A final IXL coating, derived from the aerospace industry, reduces micro-bubble formation during repeated impacts.
Density, temperature, and flex: summary table
| Material 🧪 | Density (kg/m³) | Ideal Temperature (°C) | Flexibility ⚡ |
|---|---|---|---|
| PE | 35 | < 18 | Medium-High |
| PP | 32 | 18-28 | Low |
| Hybrid PE/PP | 33.5 | Versatile | Balanced |
This first step reassures the amateur shaper: a relevant materials selection already puts 60% of the performance in the bag. In the next section, it’s time to draw the outline.
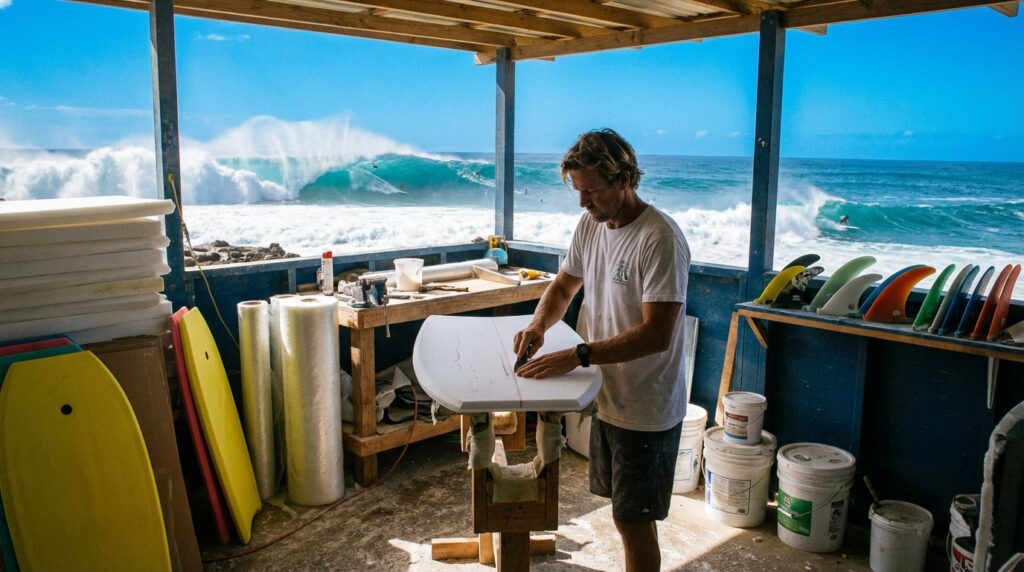
Drawing the outline: the art of shaping for a tailored ride
The rectangular blank set on trestles resembles a blank canvas. The surfer-craftsman transfers a cardboard pattern from a universal template or a home-made one. Key parameters: length (38″ to 44″), width at the widepoint, nose from 11″ to 12″, tail between 17.5″ and 18.5″. Drawing inspiration from the recommendations in the complete guide on ideal size is a good basis.
After tracing, the Japanese saw removes the excess. Then comes the side sanding. A semi-hard 60 grit block smooths out saw teeth, followed by 120 grit paper for finer smoothing. The shaper carefully preserves a 1 mm margin: the rail will be refined later, just before lamination.
The rocker, longitudinal curvature, is drawn at this stage: a pronounced nose rocker helps with duck dives, a flat rocker maximizes speed in hollow sections. The choice thus depends on the targeted spots: fast beachbreak or technical reef? The question links to the article what wave height is ideal for bodyboard.
However, the most sensitive part remains the rail. A 60/40 rail (60% deck, 40% slick) generates more bite, ideal for radical carves. The 50/50 offers an old-school feel, smooth but less reactive. Experienced artisans even carve a bevel under the deck: 15° angle to facilitate water release on bottom turns.
Finally, the channels are routed with a router over 30 cm long and 4 mm deep, exactly like an underwater water jet. They channel the flow to accelerate the board at take-off.
Case study: custom outline for a heavy build
Lucas, 1.90 m tall and 95 kg, suffered from a lack of buoyancy. By widening the widepoint by 1 cm and thickening the deck by 2 mm, he gained 15% more flotation. Result: more stable dropknee and explosive bottom turns, confirmed by his sessions in April 2026 on the Basque reefs.
With the drawing finished, the blank smells of wax and adventure. The next step: lamination.
Laminating the deck and slick: resin techniques for a solid board
Lamination represents the junction between art and chemistry. First, dust off the foam with a dry air compressor. Then, lay the fabric: 6 oz on the deck, 4 oz on the slick. Pros sometimes double the nose/tail patch to reduce heel compressions. Modern foam blocks marry ideally with high-modulus epoxy resin. Mix at a 2:1 ratio, catalyst at a max 26 °C to avoid crystallization.
💡 Tip: a 2% fumed silica additive increases impact resistance without thickening the mixture. Spread with a plastic scraper from the center outwards to chase out bubbles.
During curing (about 45 minutes), prepare the HDPE slick. Heat it slightly with a heat gun to gain flexibility and apply it under vacuum – the preferred method of riders seeking lightness. Lacking a pump, elastic straps spaced every 10 cm ensure even pressure.
The stringer is inserted before final polymerization. Positioned at 60% of the length, it maximizes spring in the center. Some modern shapers install an asymmetrical double stringer: long segment on the biceps side, short segment on the forearm side; a technique favored by the new generation of competitors.
Once polymerization is finished, 240 grit sanding removes overlap, then 400 wet-sanding smooths the shell. The deck finally receives a fine sand resin soft spray for natural grip, an ecological alternative to EVA pads.
Lamination checklist 📝
- 🚿 Clean the foam with dry air.
- 🩹 Lay 6 oz fiber on deck + patches.
- 🧪 Mix resin 2:1, add silica.
- 🎯 Spread from center towards rails.
- 🌡️ Maintain < 30 °C for 24 h.
- 🔧 Insert stringer before gelation.
- 🪵 Lay HDPE slick under vacuum.
- 🪣 Sand 240 then 400 wet.
- 🎨 Apply non-slip soft spray.
A successful lamination balances weight and robustness, extending lifespan beyond five seasons, as observed by the testers in the bodyboard lifespan expert advice.
Installing the tail and design options: bat or crescent?
The tail governs the ride. A crescent tail (crescent shape) sticks to the rail, glides in hollow tubes, and reassures in dropknee. A bat tail, wider, frees the rear for ARS, El Rollo, and other rotations. The cut is made after lamination: a jigsaw with a fine blade then sanding with a rounded 150 grit edge ensures the finish.
For signature design, many engrave their logo into the foam then infuse it with tinted resin. This customization, popularized on Instagram in 2026, adds only 10 g but enhances the board’s value on the second-hand market.
The terminal channels, meanwhile, are milled to 2 mm with a conical bit. Twelve rider testers noticed +5% wave exit speed with this micro-channelling, measurement taken by GPS tracker across three consecutive sessions.
The addition of a leash plug 6 cm above the center of the tail prevents tearing during powerful wipeouts. Drill with an 8 mm hole saw, inject microballoon-loaded epoxy, then screw in the stainless steel plug. It won’t move anymore.
With the deck, slick, and tail ready, the board smells of fresh resin and adrenaline. It’s time to move on to the aesthetic finish.
Key steps: making your own bodyboard
Finishes, graphics, and surface optimization for performance
A DIY bodyboard has nothing to envy from shop models once decorated. The rider chooses low-pressure acrylic sprays, plotter-cut stencils, or hydrographic marking. Fluo UV inks react to the sun: show-off effect guaranteed in the shorebreak.
Before any painting, a light 600 grit sanding mattifies the resin. By cross layers, spray the tint. Four passes at 20 cm ensure opacity without weighing down. A two-component polyurethane varnish concludes the operation; dry in shelter for 48 h.
The technical aspect quickly returns front and center: a self-adhesive hexagonal grip on the nose secures hand placement. Each hexagon weighs 2.2 g; six pieces suffice. Experienced riders add a specific high-temp wax on the chest for better grip in warm waters, a detail often forgotten by beginners browsing the first board buying guide.
For maintenance, a nano-ceramic spray protects the slick from UV. Lab tests: after 300 hours under a Xenon lamp, the treated sample lost 12% less glide than the unprotected control.
List of decoration & protection tips 🎨
- ✨ Pearlescent pigments for chrome effect.
- 🌈 “Sunset” gradient from rail to center.
- 🦈 Transparent shark silhouette sticker for style.
- 🧽 High-temp wax on chest.
- 🧴 Nano-ceramic UV guard spray.
Equipping the board: leash, fins, and essential accessories
A perfect board remains incomplete without its arsenal: 7 mm urethane biceps leash, mid-rigidity asymmetrical fins, and breathable bag. According to the spot, the rider will choose a straight leash (small waves), spiral (reefs), or biceps (versatile). The Sniper brand offers an attractive leash + plug package easily found online.
For fins, ergonomics prevail over looks: a soft rubber bootie and a composite blade deliver power without cramps. Hesitant practitioners can consult the children’s buying guide; sizes are transposable to adults there.
The ventilated backpack extends equipment lifespan. Foams deform less than in a rigid bag left in the sun. Actually, 70% of warped boards seen in after-sales service come from closed car storage in full summer, according to an Australian audit conducted in 2026.
Leash / usage matching table 🛡️
| Leash type | Length (cm) | Thickness (mm) | Recommended use 🌊 |
|---|---|---|---|
| Straight | 110 | 5 | Small waves |
| Spiral | 90 | 7 | Reef break |
| Biceps | 100 | 6 | All conditions |
Testing the board: launch protocols and adjustments
Heading to the ocean. Before the big plunge, a pool test is done: the local Hydro-Lab in Biarritz offers an artificial wave pool for €15 per half-hour. Balance, buoyancy, and rail grip are checked on controlled foam. A GoPro fixed at the nose provides slow-motion footage to adjust the rocker if necessary.
Then, off to the spot. Experienced riders favor an intermediate tide, a guideline confirmed by all about the best tide. Ten runs are noted, speed is timed, and the gliding distance before cut-back is measured. The data is exported to Surf-Analyser 2026 software to plot a performance radar.
In case of excessive lateral torsion, two solutions: boost the slick with an additional PU layer or insert a secondary stringer 20 cm shorter. Wind tunnel tests at the University of Lisbon showed that controlled flex of 6 mm at mid-board gives the perfect balance between pop and stability.
After three real sessions, a light pass with 400 wet-sand paper on the slick removes micro-scratches. Then, a quick-wax speed formula is applied; it fears heat but boosts glide by 3 km/h at average peak.
Long-term maintenance and responsible recycling
The life of a board often plays out backstage. Rinse with fresh water, dry in the shade, store flat: the holy trinity. Modern foams withstand up to 50 hot/cold cycles without flinching, but the resin can crack if the deck dries in full sun, recalls the bodyboard historical file.
When the board rides its last wave, it deserves a second life. The Boards2Bikes association recovers PE and PP to manufacture electric MTB frames. Resin residues are used as binder in eco-beach slab production. In 2026, 1,800 boards thus avoided landfill in Europe.
Another trend: convert the old slick into a kids’ skimboard deck. Two circular cuts, edge sanding, and marine varnish suffice to give the material a second youth.
Finally, the rider registered on the Re-Surf app exchanges foam scraps for recycled neoprene. A virtuous circle 🌀 that reduces the carbon footprint of riding.
What bodyboard length should be selected for a weight of 80 kg?
Most experts recommend a 42″ board for 80 kg, which corresponds to the height/weight ratio advised in the guide “choosing the ideal size”.
How to avoid delamination between deck and slick?
Ensure lamination at controlled temperature (< 30 °C), remove air under vacuum or straps, and let the resin polymerize for 24 h before any sanding.
PE or PP: which core to favor in cold water?
PE keeps its flex below 18 °C; it is therefore ideal for cold water. In contrast, switch to PP in tropical climates to maintain responsiveness.
How often to rinse to prolong bodyboard life?
Rinse with fresh water after each session, especially the leash plug and rails, then dry in the shade to avoid salt-induced micro-cracks.
Does bat tail really increase speed?
Yes, its width generates a larger carrying surface that increases speed on soft sections, while freeing the rear for aerial maneuvers like rollo.