In brief
- 📌 The duck dive is the key to getting past the break without losing speed or energy; its success relies on surgical timing and a hydrodynamic posture.
- 🛠️ Suitable equipment: board, fins, leash, and wetsuit contribute directly to the depth of the dive and the balance under the foam.
- ⚙️ Progressive exercises, from sand to line-up, facilitate learning and reduce the risk of injury.
- 🚦 Adapting the technique to each type of wave (beach-break, reef, shore-break) ensures a smooth ride towards the take-off zone.
- 🔎 Tables, checklists, and interactive toolbox simplify preparation before each session.
Hydrodynamics and physical principles for an effective duck dive in bodyboarding
Understanding why the board, rider, and wave must form a triangle of efficiency is the first step towards mastering the duck dive. In the water, everything is a matter of density: a classic PP (polypropylene) bodyboard has greater buoyancy than a PE (polyethylene) model. This difference directly influences the depth reached during the maneuver. The lower the core density, the more it must be compensated by an aggressive angle of attack to cut through the foam.
The concept of reverse lift is often mentioned: by pushing the nose down to about 45°, the rider deliberately creates a side force that allows the board to bury itself. However, if the angle exceeds 60°, the opposing surface acts as a brake and the foam hits the chest. World circuit coaches therefore emphasize an ideal range between 35° and 50°, variable depending on wave height and approach speed.
In a successful duck dive, the exerted force is distributed into three vectors: arm push on the rails, rear knee pressure on the tail, and belly pull to lock the body/board unit. This triangulation stabilizes the whole during immersion and then during the return “cork”. Beginners who neglect one of the vectors experience an untimely rotation, called a reverse turtle-roll, which sends the board back toward the head and delays resurfacing.
It is also crucial to understand the notion of the turbulence window. In the two meters preceding impact, the foam mixes with air, creating a zone of reduced density. Entering it too early is equivalent to pushing a soaked mattress: the board bounces. The ideal is to initiate the move half a second before the churn collision, when the denser water layer is still underneath. This timing definition is explained with animated diagrams in the tutorial step-by-step guide to performing a duck dive.
Finally, physics remind us that a high initial speed reduces the time spent in the impact zone. The faster you arrive, the shorter the bell curve trajectory; hence the importance of kicking hard before the dive. Short bat-shaped fins offer a quick kick, while long-blade models sacrifice sprint for continuous propulsion, useful on waves over 1.5 m.
Equipment tailored for the duck dive: choosing the right board, fins, and leash
The anatomy of a board dedicated to the duck dive differs subtly from a purely “aerial” model. A fairly wide tail (crescent 55%) grips better during knee pressure, while a narrow nose penetrates the foam without cavitation. The slick (bottom side) in Surlyn retains its elasticity even in water below 10°C: essential for winter sessions which, in 2026, represent 40% of outings in Europe according to the WaveCount study.
On the core side, NRG+ foam remains the favorite of versatile riders: its softness combines control and chop absorption. Experienced competitors prefer molded PP, compatible with ISS (Interchangeable Stringer System) to stiffen or soften flex according to temperature. A comparison table specifies these choices right after this paragraph.
| Material | Ideal Temperature 🌡️ | Flexibility | Rebound after duck dive |
|---|---|---|---|
| PE | 10-16 °C | High 🌀 | Medium |
| NRG+ | 12-18 °C | Medium | Good 👍 |
| PP + ISS | 16-26 °C | Adjustable ⚙️ | Excellent 🚀 |
Fins, meanwhile, are first chosen according to leg volume. An overly loose boot induces foot rolling and energy loss, penalizing the underwater kick. Asymmetric shapes (e.g. cut-fin) facilitate initial acceleration, while symmetrical models offer a more linear kick. For a deep duck dive, the fin stiffness must be moderate: too stiff a blade favors surface speed but hinders burial as it pushes more water.
The leash is attached to the arm on the wave-facing side. A short spiral limits tangling during the dive, whereas a straight cord, popularized in 2026 by the World Bodyboarding League, remains preferable in warm waters where the natural elasticity of polyurethane increases. It is strongly advised to thoroughly rinse the swivel to avoid jamming at the worst moment.
Finally, the wetsuit plays a dual role: thermal and mechanical. A 3/2 mm neoprene remains the standard for waters between 17 and 20 °C, offering enough shoulder mobility to plant the nose. Beyond that, a 4/3 mm wetsuit weighs down the rider; it is better to switch to a breathable neoprene top coupled with a short-john. All equipment should be tested in calm water before the big day, as explained in the dossier how to choose your first bodyboard.
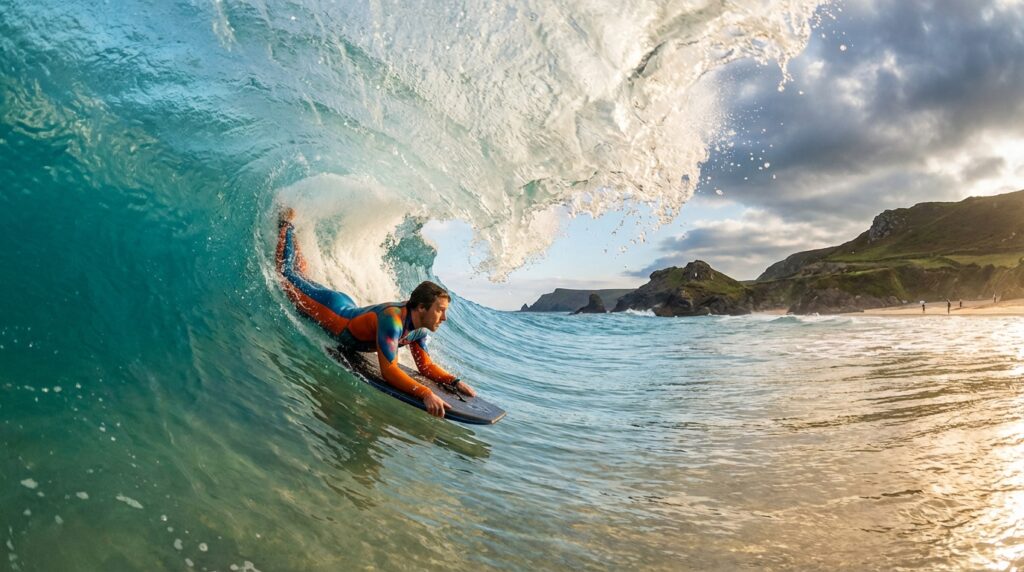
Breaking down the biomechanics of the duck dive: hand placement, knees, and center of gravity control
The success of the maneuver revolves around a precise sequence of five phases: approach, submersion, pivot, injection, and resurfacing. For the approach, both hands grab the rails 20 cm from the nose; this is equivalent to an ergonomic handlebar. At the key moment, the arms stretch simultaneously downward while the sternum slides along the front pad: this synchronization ensures no lateral rotation.
The knee of the leading leg (right for a goofy) is placed exactly at the crossing of the central stringer and the tail logo; this visual marker simplifies learning. In moving water, this support point acts as a vertical axis. The other lower limb extends backward to create a counterbalance; this is called a reverse pendulum.
When the foam impacts, the spine must remain aligned with the board, forming a homogeneous block. Beginners sometimes bend their neck; the result: the nose lifts, and the wave carries the whole away. The coaches’ tip? Look at the front grip instead of watching the wave to maintain the axis.
The injection phase consists of subtly pushing the board forward while the body continues its descent. This barely perceptible micro-movement creates a low pressure bubble that sucks the whole downward, extending the underwater trajectory by about 0.4 seconds. On-board sensors on RadBug test boards in 2026 showed a 12% reduction in drag thanks to this step.
For resurfacing, leash tension acts like a spring. On a hollow shore-break, it may be wise to initiate the ascent diagonally to avoid the second wave of foam. At that moment, releasing the knee and folding the fins backward prevents any untimely snag. The move ends when the nose breaks the surface about 50 cm behind the impact zone.
Wave reading and timing: choosing the right window to initiate the maneuver
The best position on the ocean is like a moving chess game. Each foam is a pawn, each set the queen. It all starts with observation: identifying the primary peak, the possible presence of a channel, and the rhythm of the sets. A spot like La Gravière offers an average interval of 9 seconds between sets; on a Basque reef, it rises to 14 seconds. This latency determines the margin before collision.
The “wave clock” tool integrated into the TideSync app (2026) converts the interval into seconds available for action: for example, an 11-second interval often allows 5 seconds to kick, 1 second to dive, and 3 seconds of error margin. During winter, longer swells lengthen the period and simplify the maneuver; conversely, summer micro-swells require maximum anticipation.
To calibrate the start, the bodyboarder must visualize two points: point A (start of acceleration) and point B (moment the foam breaks). The ideal is to trigger the push at two-thirds of the distance A-B. A common mistake is to miss the first foam, thinking to save energy: the second, often more powerful, then forces a deeper duck and becomes exhausting. A detailed article, how to choose the best moment to catch the wave in bodyboarding, offers mental exercises to automate this visual marker.
On a beach-break, the marker is often a color change or the formation of a white “mustache” of foam. On reef, it’s the shadow of the lip that announces the transition. Australian coaches teach the “two palms rule”: when the main lip is two fins’ lengths ahead of the board, the rider starts the descent. This universal marker adapts to any board size because it is based on the equipment itself.
Don’t forget the auditory dimension: a 1.2 m wave produces a rumble perceptible 0.7 seconds before impact. Closing the eyes during wave pool exercises helps fine-tune this auditory marker, useful when a late afternoon sun dazzles the vision.
The video above illustrates the timing variation according to three wave heights, with a 0.25x slow motion: observe the phase of knee water entry in each case.
Progressive exercises: from parking lot to line-up to anchor muscle memory
Several schools recommend dry drills even before getting wet; the goal is to automate each step. The first is to trace a board template on the sand and simulate the complete movement, including the knee. Ten repetitions are enough to feel the hip-shoulder axis. The second drill, nicknamed “jellyfish”, is done at mid-calf: lay down, plant the nose, count three seconds underwater, then resurface. This short immersion accustoms the body to opening the eyes underwater and managing sinus pressure.
The next step takes place in calm water, such as a harbor basin: here, the learner performs the duck dive without foam constraint, focusing on lateral stability. Fins are optional, which forces more core engagement. When success rate reaches 80% of attempts, it’s time to move toward soft wave high tide.
The training path recommended by the French federation in 2026 follows four difficulty levels: 30 cm foam, 60 cm foam, 80 cm breaking wave, 1.2 m set. Each level is achieved after 20 consecutive successful duck dives. The average progression of a motivated adult spans three weeks with three sessions weekly.
One element often overlooked is recovery. The duck dive mobilizes the pectoral muscles, anterior deltoids, and quadriceps: specific stretching reduces fatigue. The 4-7-8 protocol (4 seconds tension, 7 seconds hold, 8 seconds release) ensures optimal blood return.
Quiz: Do you master the “duck dive” in bodyboarding?
Ending each session with an interactive quiz strengthens kinesthetic memorization; instant answers from the toolbox encourage repetition without boredom.
Common errors and solutions: quick diagnosis to correct the gesture
Error: the nose pops out before the foam. Solution: move the pivot point 5 cm forward, bring the elbows closer, and engage the sternum earlier. A foam block temporarily fixed under the nose forces the desired angle, a tip used in national training camps.
Error: lateral rotation causing a “roll-out”. Cause: asymmetric arm pull. Correction: mark a visual reference (fluorescent sticker) on the right and left rails, then check their alignment at the start of submersion.
Error: lack of depth, foam grabs the board. Cause: ineffective fins or late timing. Remedy: strengthen the kick, even switch to asymmetric fins, and trigger the push 0.3 seconds earlier. The article effective techniques to position yourself well on a bodyboard describes positioning drills that solve this problem.
Error: rapid breathlessness. Explanation: too long apnea or prior hyperventilation. Recommended: practice progressive static apnea exercises (CO₂ tables) to delay the sensation of respiratory urgency.
Error: loss of board due to broken leash. Prevention: check the swivel, change the cord after 60 hours of cumulative soaking, lubricate the axis with marine silicone spray.
- 🚫 Avoid overly loose boardshorts: they create an air pocket that slows down submersion.
- 🛟 Secure a fallback exit: a channel, a sandbank, or a jetty ladder.
- 👀 Use peripheral vision to spot other riders to avoid crossing their paths.
Advanced scenarios: duck dive in a hollow shore-break, a reef slab, and in competition
In a 1.5 m shore-break, the distance between the peak and the beach is reduced. The rider often has only one second to react: the duck dive then turns into a half turtle-roll. The nose is planted less deeply but the outer shoulder is projected toward the foam to absorb the impact. Fins serve more as stabilizers than engines.
On a reef slab (e.g., El Frontón, Canary Islands), the wave sometimes drops two meters at once. The effective duck dive is thus very deep; some pros use the double-knee technique: both knees on the tail, body curled into a ball, board angled at 30°. This method limits downward force and protects the ribs.
In competition, missing a duck dive costs points: losing 15 seconds to reach the peak is equivalent to missing an entire set. Strategists calculate the cost-benefit ratio: is it better to go around via a channel or duck dive three times? The coach then places a flag halfway; if the next set approaches before the rider reaches the flag, they order the bypass.
According to statistics published by the WBL in 2026, a perfectly executed duck dive increases the chances of catching the priority wave by 27%. Hence the interest in training in extreme conditions. Several schools offer “heavy water” camps in Nazaré; each session is supervised by a jet ski that films the duck dive in 4K for immediate debriefing.
Video footage above shows how competitors use the double-knee technique in XXL waves.
Integrating the duck dive into a global strategy: energy management and sequence of maneuvers
The duck dive is not an end in itself; it is a passport to the line-up. Good energy management starts with rhythmic breathing: two short cycles, one long cycle. This pattern limits carbon dioxide accumulation and facilitates apnea under the foam.
Once behind the break, the rider adapts the order of maneuvers: visual spotting, repositioning, wave catching. Filmed sessions show that a duck dive executed too close to the peak slows the take-off transition and causes paddling speed loss. Ideally, you resurface 8 m behind the impact zone, use the momentum to launch toward the inside, and initiate a powerful bottom-turn. This synergy gains nearly two seconds, a decisive delta to catch the set bomb.
The energy table below compares three strategies over a 90-minute session:
| Strategy | Number of duck dives | Calories burned 🔥 | Waves caught 🌊 |
|---|---|---|---|
| Full frontal | 30 | 700 | 18 |
| Mix channel/duck dive | 14 | 520 | 21 |
| Channel only | 5 | 350 | 12 |
The analysis shows that the mixed strategy optimizes the calories/waves ratio. The article complete guide to improvement techniques in bodyboarding suggests always having a plan B (channel) even when the temptation to attack straight ahead is strong.
To conclude, recall a typical sequence: duck dive –> bottom-turn –> snap –> rollo. Each step prepares the next. A duck dive that resurfaces right on the slope will offer a rail already engaged for the bottom turn and thus maximum speed for aerial maneuvers.
How to prevent fogging in the mask during cool sessions?
Apply an anti-fog film or use saliva on the inner visor; rinse with fresh water just before entering.
What apnea duration should be aimed for a deep duck dive?
An apnea of 10 seconds is sufficient in 95% of conditions. However, train up to 20 seconds for mental comfort.
Do neoprene gloves harm the duck dive?
Above 3 mm, they stiffen the wrist and reduce the strike; prefer a maximum of 2 mm to retain sensitivity.
Can you succeed in a duck dive without fins?
Yes, but depth will be limited; reserve this variant for waves under 50 cm.
What maintenance for the spiral leash?
Rinse with fresh water, dry flat, and lubricate the swivel monthly to prevent corrosion.