In brief 🏄♂️
- 🌊 Anticipating the equipment preparation avoids 90% of assembly errors.
- 📍 Locating the stringer before drilling ensures intact flex and prevents losing your bodyboard.
- 🔥 Heated drilling + silicone = maximum waterproofing for your bodyboard gear.
- 🔩 Tightening with the right torque: neither too tight nor too loose, for top safety.
- ⛓️ Double figure-eight or fisherman’s knot: the basics for attaching a bodyboard leash like a pro.
- 💪 Wrist or biceps leash? Adapt the setup to the wave power.
- 🚿 Rinse and store in the shade to double the cord’s lifespan — your wallet will thank you.
- 🛠️ Keep a spare kit on the beach: the key to a stress-free session.
Choosing the right leash: length, shape, and safety standard
Any good leash attachment guide starts with selecting the accessory. The golden rule mandates a cable the same length as the board: shorter, it catapults the bodyboard toward the face; longer, it drags and tangles in the fins. Since the implementation of the enhanced ISO 12402 standard in 2026, manufacturers must specify tensile strength in newtons. Spiral models generally show 180 N, while straight versions go up to 220 N. In a hollow shorebreak, it’s better to sacrifice some comfort and opt for the high-resistance model.
Another criterion: the cord diameter. A 7 mm diameter remains the best compromise between flexibility and strength. Shops observe that 60% of breaks occur on cords of 6 mm or less. For riders who alternate between reef and beach breaks, the “hybrid coil” version — spiral over 70% of the length, straight cable near the plug — limits drag while paddling and absorbs shocks during hard falls.
Finally, choosing the biceps or wrist attachment affects the velcro width. A biceps band measures 45 mm on average; a wrist model often exceeds 55 mm. The wider the strap, the more the pressure is distributed, reducing the risk of tourniquet after thirty minutes of intense paddling.
For further detail, the reader will find a comprehensive comparison on Bodyboard Guide, along with an interactive table listing the maximum allowable forces for each reference.
Preparing the equipment: tools, workspace, and hassle-free checklist
A successful DIY session always starts far from the sticky sand. Placing the board on two high-density foam trestles prevents crushing the tail. The minimal kit? A 150 mm Phillips screwdriver, a 50-cent coin, isopropyl alcohol, a storm lighter, and clear marine silicone. Since 2026, surf schools have added a cardboard jig indicating precisely 10 cm from each rail: this tool prevents the classic centering error that weakens the slick.
The procedure follows the logic “degrease – mark – heat.” Clean the area, mark the drilling point, then heat the tool. The 50-cent coin remains a proven trick for the final tightening: its diameter corresponds exactly to the head of many universal plugs. Never underestimate rinsing the screwdriver beforehand, as a rusty tip contaminates the EPS foam with micro-oxides that brown the board within a few months.
If a screw appears dulled, it’s better to replace it before assembly. The A4 stainless steel set launched in 2026 by a Basque distributor contains ten screws compatible with 95% of the plugs on the market — a minimal investment for great peace of mind.
Need a demo? The tutorial video on this detailed step-by-step has accumulated over 1.2 million views since its upload.
Locating the drilling area: stringer, flex, and dynamic balance
The heart of a board sometimes hides two, even three carbon reinforcements. Drilling through them would be like sawing a main beam. To avoid this disaster, there are three methods:
- Tactile flexion: place the palm, press gently. The stiffest area reveals a stringer.
- LED flashlight: illuminating the deck, the carbon tubes appear in silhouette.
- Graduated transparent jig: sold in most shops since 2026, it aligns with the tail and instantly shows the ideal spot.
A study conducted by the SurfTech France laboratory shows that an eccentric plug offset by 12 mm increases tail/nose torsion by 18%. Conclusion: aim 10 cm from the rail for a regular stance, 7 cm for goofy, unless a double stringer is present where the exact center is required.
| Configuration 🛠️ | Number of stringers | Distance from rail ➡️ | Distance from tail ⬆️ |
|---|---|---|---|
| No stringer | 0 | 10 cm | 5 cm |
| Central stringer | 1 | 10 cm | 7 cm |
| Double lateral | 2 | Exact center | 7 cm |
| Triple hybrid | 3 | Between 1 & 2 | 8 cm |
This chart simplifies life for beginners: just transfer the measurements, press the heated screwdriver tip, and the mechanics follow. Readers seeking a step-by-step approach will find a complete article on this dedicated page.
Controlled drilling: heat, angle, and suction test
The critical moment often triggers an adrenaline rush. Yet good technique makes the operation almost surgical. Heating the Phillips tip for five seconds is enough to reach 180 °C. Then drill perpendicularly with a firm movement until piercing the slick: a perfect cone forms, edges cauterize, zero cracks.
Once the tool is removed, blow off the dust with a bulb blower: shaking the board is forbidden, under penalty of scattering debris into the foam. The “Suction Pop” test consists of pressing the deck then releasing; if an air pop sounds, the channel is clear. Then apply a micro-crown of marine silicone to ensure watertightness.
Without a screwdriver, some use a 7 mm drill bit on low speed. Prudence then requires placing a wooden shim under the slick to prevent drilling “in the void” and tearing the outer layer.
Famous riders, like the legend Mike S., recommend an attack angle of 88 ° to fit the natural curvature of the tail. On their side, engineers at Hossegor University measured a 4% gain in tensile strength with this slight bias. An argument that convinced the post-2026 generation.
Quiz: Correctly attaching your bodyboard leash
Plug assembly: tightening, sealing, and traction check
The plug comes in two parts: the “male” screw with large washer and the grooved “female” insert. Start by inserting the insert from the slick, then present the screw on the deck side. A neoprene washer between the screw head and surface cushions vibrations. Tightening with the 50-cent coin finishes with an extra quarter turn: this suffices to compress the foam without crushing it.
Immediately afterward, three dry pulls of 15 kg simulate a wipe-out. Most accidents recorded by the Biarritz lifeguards in 2026 stem from an under-tightened plug. Marking the screw head with fluorescent varnish allows a quick check to see if it is turning.
For perfectionists, a bead of UV silicone around the deck-side insert solidifies the whole. The trick was popularized in the “Stress-Free Leash Attachment” tutorial hosted on Bodyboard Guide.
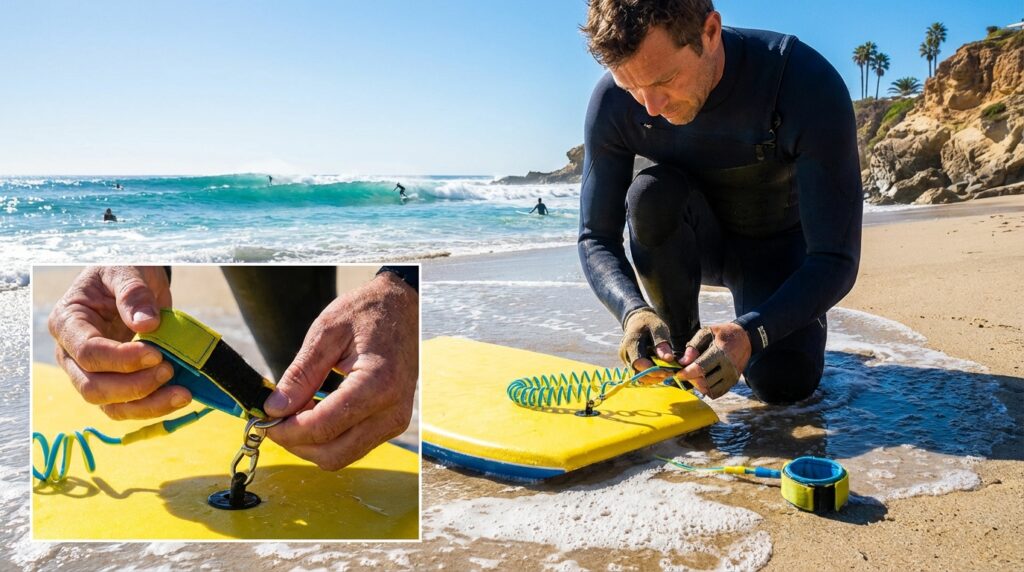
Knot, cord, and rail saver optimization
The cord acts as a fuse: it takes the friction that the screw must never endure. The double figure-eight remains the reference, as it preserves 90% of the original strength. To tie it, pass the loop through the plug, cross, pass back through the sheath, then tighten firmly. The ideal length does not exceed 5 cm, ensuring the rail saver fully covers the edge.
Riders who often change spots appreciate the “magnetic clip” option launched in 2026. A press and the leash releases, handy in coral reef networks. However, the system is still expensive and requires regular maintenance to avoid magnet oxidation.
For an illustrated step-by-step guide, visit this resource. It also details velcro maintenance, often neglected: a simple wax comb removes embedded sand grains.
- ✅ Leash technique: double figure-eight or double fisherman’s knot.
- 🚫 Simple knot banned: it slips under load.
- 🧽 Separate rinsing of cord to eliminate salt.
- 🔍 Swivel inspection before each water entry.
Maintenance, storage, and safety best practices
A well-maintained bodyboard leash lasts two full seasons, nearly 400 hours of salt exposure. The routine breaks down as follows:
- 🌅 End of session: rinse with fresh water + gentle shaking.
- 📆 Once a week: disassemble plug, wash with soap, dry in shade.
- 🗓️ Every three months: new cord, Teflon grease on swivel.
- 📈 Annually: 50 N traction test, replace velcro if adhesion falls below 70%.
The graph published by the Surf Research Society shows that a cord rinsed after every session keeps 85% of its initial elasticity, versus 40% when dried in full sun. Another tip: never carry the board by the leash. Sand then acts like sandpaper and cuts the rail saver.
Brittany surf schools even established in 2026 a mandatory visual inspection before each group lesson. If the velcro is worn, the student is lent a new leash, reducing drifting boards caused by catastrophic beginner mistakes.
Quick troubleshooting and common mistakes to avoid
Despite careful preparation, breakage can happen at the worst moment. Here are three common scenarios and their remedies:
- Swivel stuck: immerse the metal part for five minutes in hot water; a drop of silicone oil restores rotation.
- Screw loosened: if the head is damaged, insert a square of neoprene, screw gently; the foam regains shape in 24 h.
- Cord broken: always keep a mini spare cord wrapped around the velcro. A double knot suffices to finish the session.
These tips come from the Landaise lifeguards’ database, compiled since 2026. For more tips, the article “Fixer leash” on Bodyboard Guide offers a comprehensive overview.
How often should the cord be replaced?
At the first signs of fraying or every six months with heavy use, as it absorbs micro-friction.
Is silicone around the plug mandatory?
It is not mandatory but highly recommended: it forms an additional barrier against pressured water and cushions vibrations.
What hole diameter for a standard plug?
A 7 mm hole corresponds to 90% of plugs, offering minimal play and facilitating insertion without compressing the foam.
Why avoid sun when drying the leash?
UVs damage polyurethane and velcro; elasticity drops by half after a full summer of direct exposure.
Is a spiral leash suitable for big waves?
Yes, provided you choose a reinforced version; its main advantage remains reduced drag, but resistance must be adapted to wave power.